iClone and Omniverse Audio2Face Deliver Accurate Singing Animation for Rap Music Video
Learn from film director Solomon W. Jagwe, co-founder of Sowl Studios and creator and director of The Adventures of Nkoza and Nankya, on how he achieved accurate lip-sync animation for a rap song using Character Creator , iClone and Omniverse Audio2Face.
The Challenge
As a 3D animation storyteller and filmmaker, one of the most challenging aspects of the process of bringing out a convincing performance from a performance actor has to do with making sure the lip-sync is well done and that the soundtrack matches the lip movement, so the viewer can focus on the story and not be distracted. Now, if you are an indie filmmaker on a budget and with a small animation team, that challenge is multiplied many times over, because you have to work with limited resources, time and funding. That means that you have to constantly be on the lookout for ways to efficiently accomplish your facial animation tasks.
When NVIDIA Omniverse and iClone partnered to create a solution that made the facial animation workflow more efficient for indie filmmakers, I knew I had found a solution to bringing to life the story I had in mind.
The Final Result
Below is the workflow I used to create the Maze BeatZ rap music video. I used Audio2Face for the facial animation, the Perception Neuron Suit to capture the body mocap, refined the facial and body animation in iClone, and rendered the final animation in Omniverse with Path Tracing.
How I Created the Song
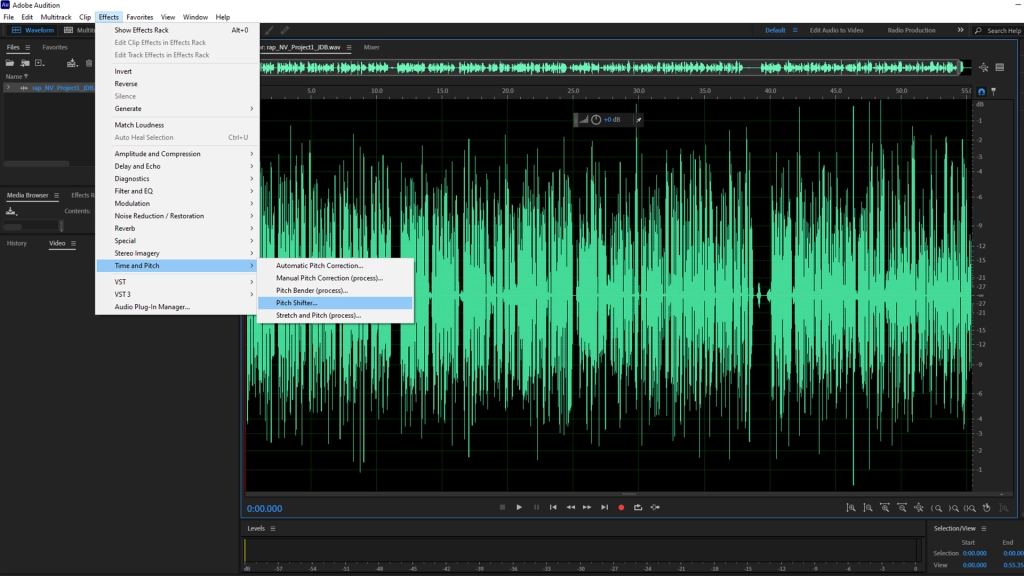
The first step I took to create the Maze BeatZ video was to come up with the rap song. I am not a rapper, but thankfully there is already a rap track that comes with Audio2Face. The one I used as a starting point is labeled rap_NV_Project1_JDB.wav, which can be found under the Audio Player tab wave source. The initial problem I faced was that I needed my rap star to be a female artist, and yet the rap track was that of a male voice. A quick solution was taking a trip to Adobe Audition and applying a pitch shift to the rap track, and voila! I had my female rap artist voice.
Another aspect I needed to add was a rap beat to the empty rap song. I partnered with a young and very talented Ugandan artist, Andereya Baguma, whose awesome music I chanced up during my music research on YouTube. Once the song creation was done, my attention turned to bringing my female rap artist to life.
How I Created the Female Rap Artist
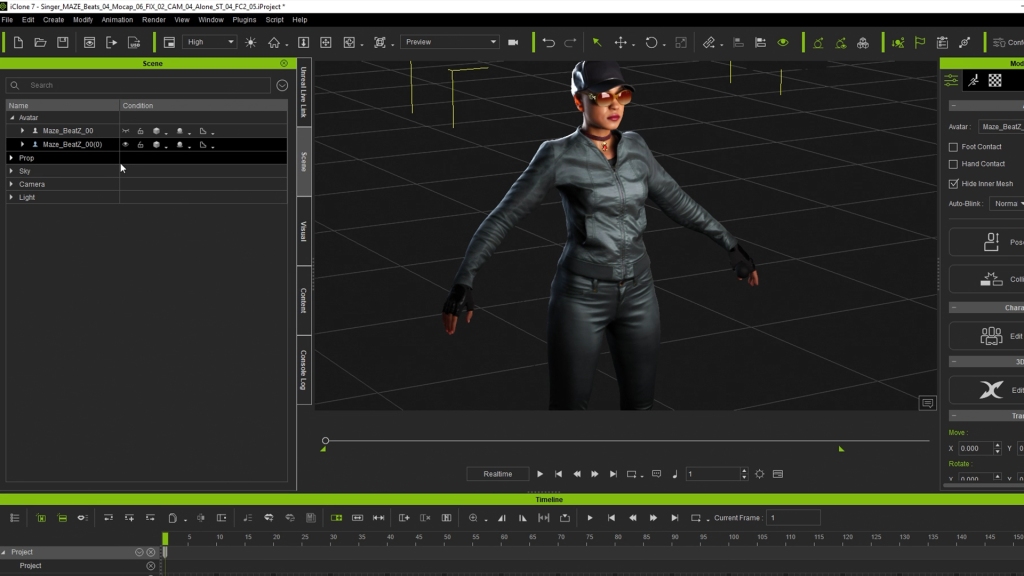
For the starting point of the body of the character, I used Alisha because I was looking for a middle aged Afrocentric character. I also made sure to use the Export version of the character because I needed to send the completed model to Omniverse for rendering. I wanted my rap star to have a cool rap outfit and opted for this Leather Outfit. Again, I used the Export version, which is highly recommended if you ever need to export your character for use outside of Character Creator or iClone. To round out the cool outfit for my rap star, I picked up some realistic looking glasses and a beautiful hat. I stayed in the realistic realm because I needed the character to look great when rendered in Omniverse.
I used Character Creator to assemble the model and prepare it for the trip to iClone so I could use Motion Live and the Perception Neuron Studio suit to capture the body mocap, and also prepare the rap artist for the facial animation creation using Audio2Face.
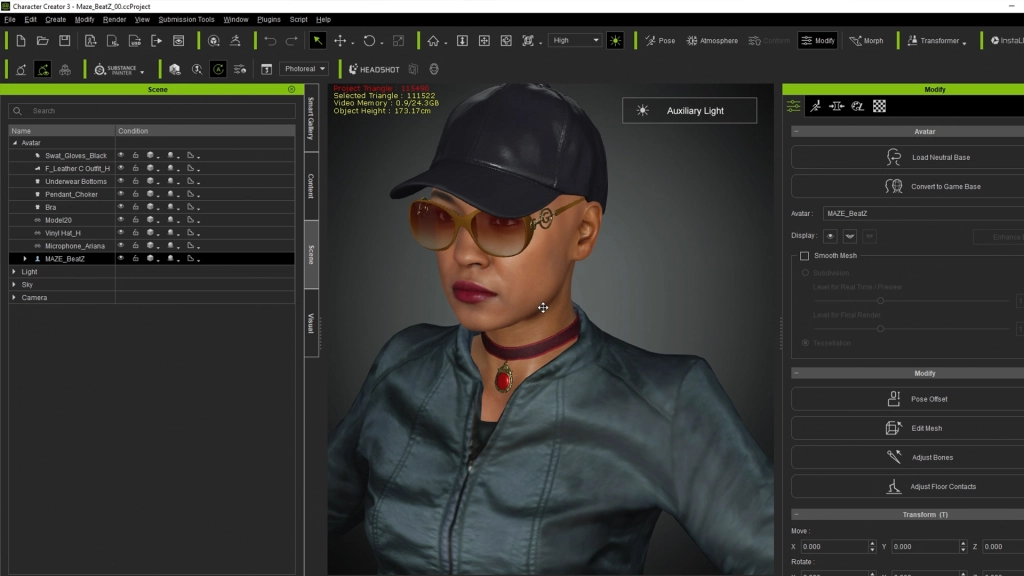
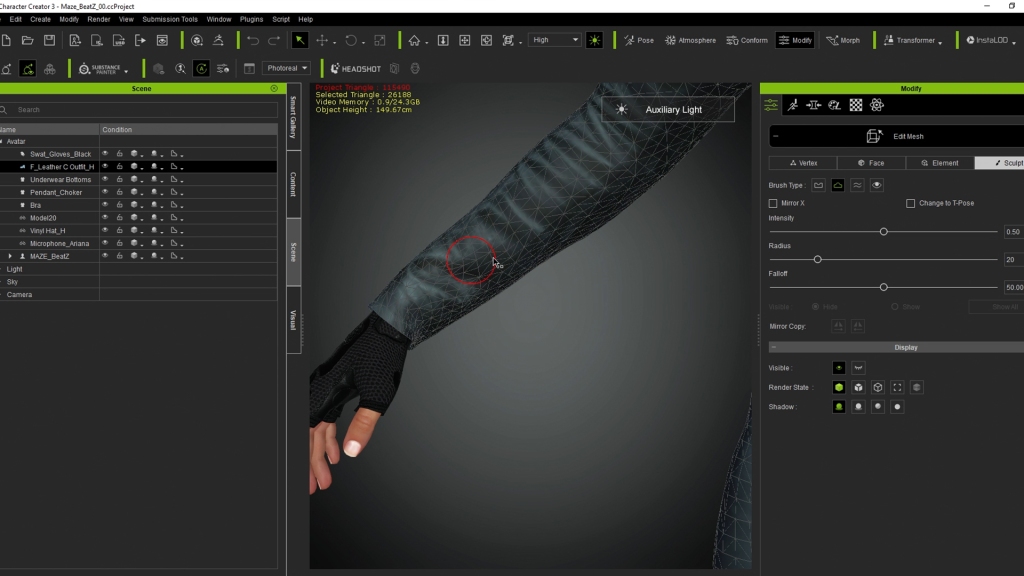
I absolutely love working in Character Creator because of the multiple ways you can fine tune your character to create a unique result. The smart gallery plugin in Character Creator makes it very easy to import all your purchased items, and apply them to your model inside of Character Creator. I was able to further refine my model using the morph and sculpting tools.
After I completed refining my rap artist in Character Creator, I exported the character as an iAvatar to iClone. You can send the model directly from Character Creator to Audio2Face, as a USD file, but I needed to make a trip first to iClone since that is where I was going to do all my animation both for the body and face.
How I Animated the Face and Body of the Rap Artist
To get my model ready for animation, I loaded the iAvatar character I exported from Character Creator, into iClone and set up some initial lighting and also imported a stage from Daz Studio, where the rap artist was going to perform.
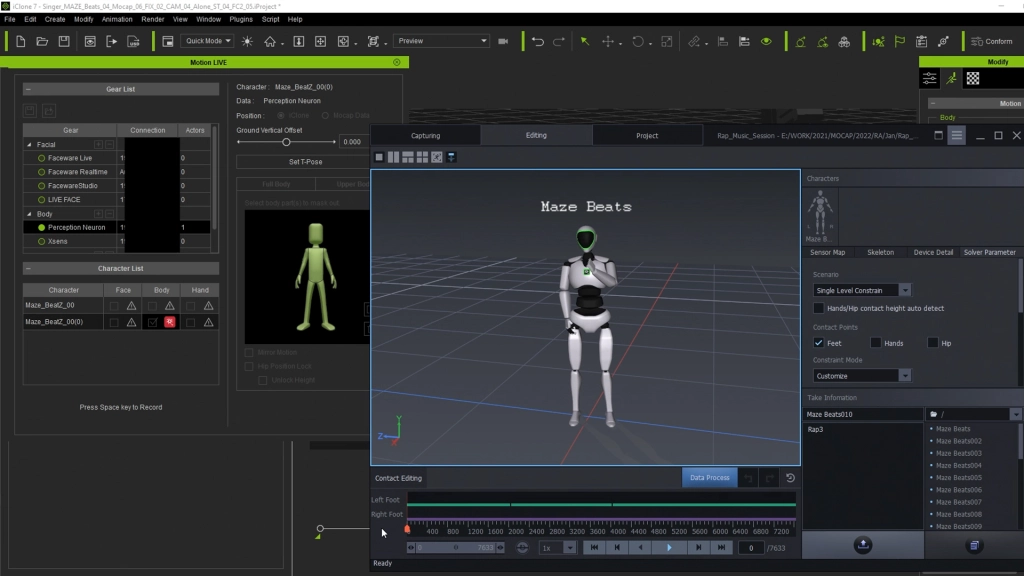
The cool thing about Character Creator characters is that they come fully ready for both facial and body animation inside of iClone. Reallusion offers several truly powerful plugins in the Motion Live platform, that extend the animation power of iClone. I relied heavily on the Perception Neuron plugin for the body mocap.
I used the Perception Studio Suit from Noitom to capture the dancing sequence of the rap artist. My 15 year old daughter volunteered to play the part. After recording her rap performance, I saved the iClone mocap files from the Perception Neuron Suit session into the Motion folder, so I could repurpose them and apply them to my iAvatar after creating the facial mocap in Audio2Face.
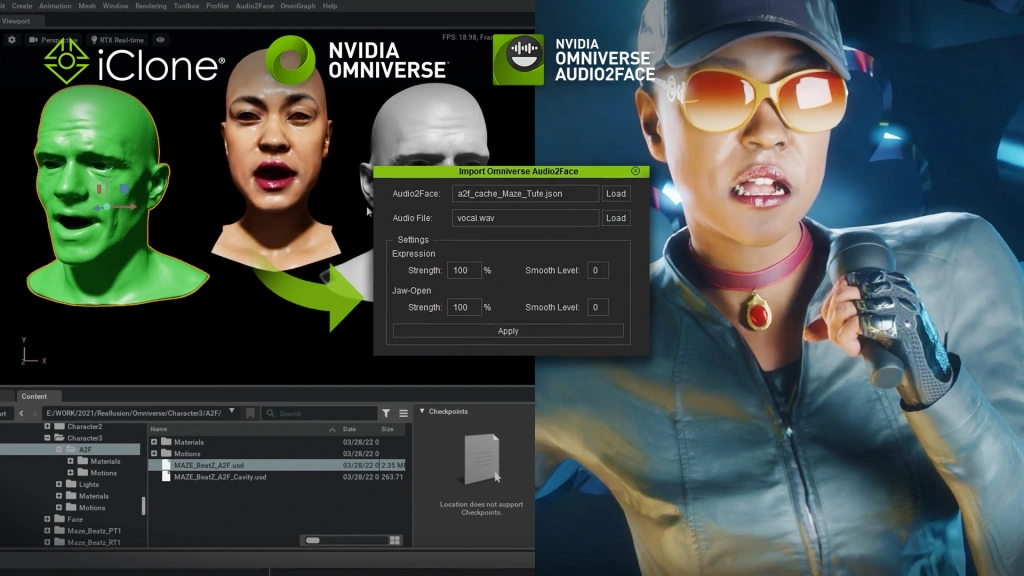
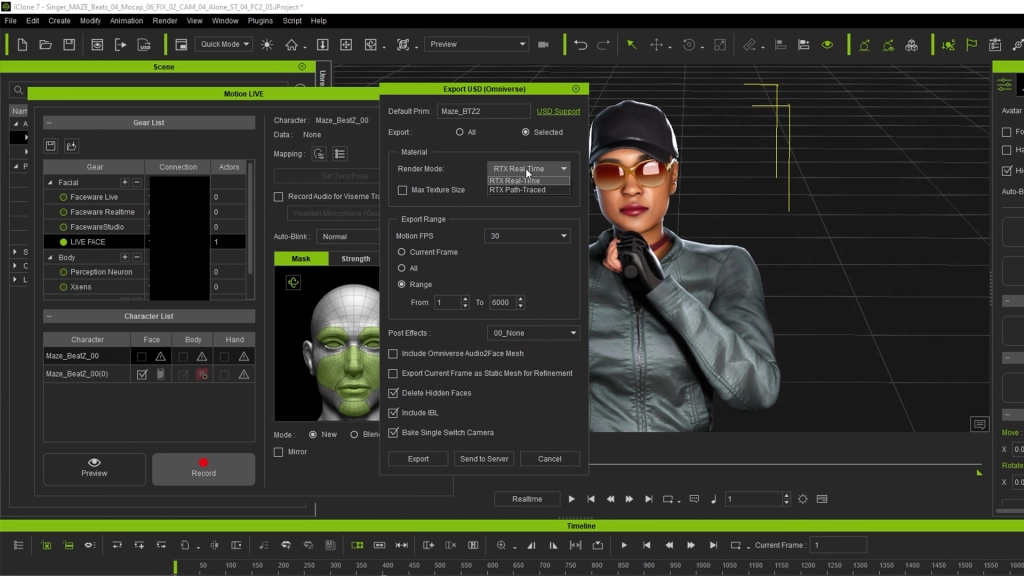
Once I had the base body mocap done, I then exported my Character from iClone as a USD file to Audio2Face. I made sure to check the “Include Omniverse Audio2Face Mesh” check box in the Export USD dialogue box. That step is extremely crucial because it offers Audio2Face the ability to recognize your character’s face so you can use the AI to create the facial mocap from an audio file. I also made sure to select the render mode. I chose to export both the RTX and the Path Tracing render mode as 2 separate versions of my character, so I could have the option to preview the animation in real-time as well as render the character using the Path tracer in Omniverse.
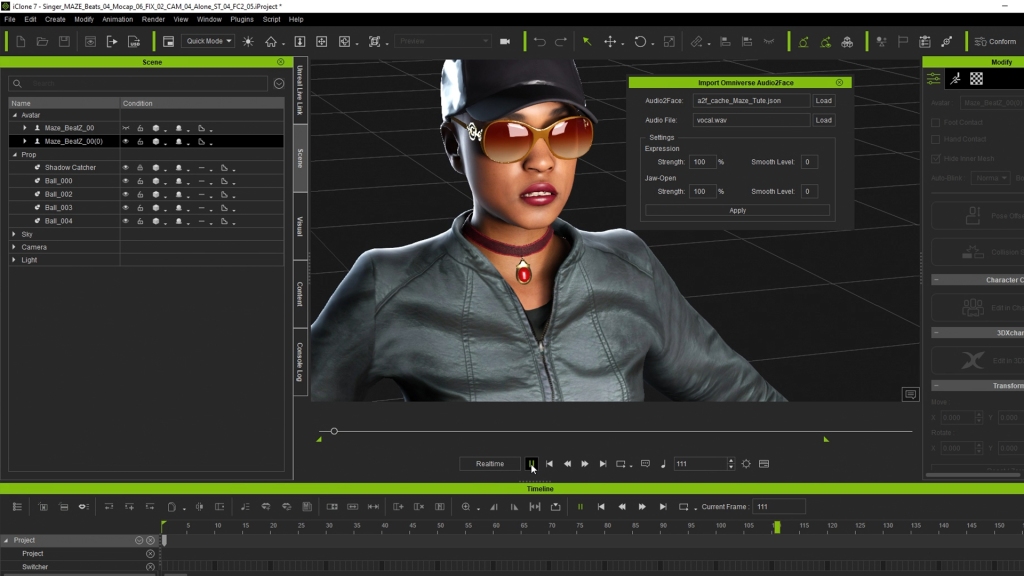
I imported my rap artist character into Audio2Face and began the process of using the built in AI to transfer the facial motion capture data derived from the rap vocal wave I mentioned in the earlier steps of this workflow.
Audio2Face Highlighted Steps
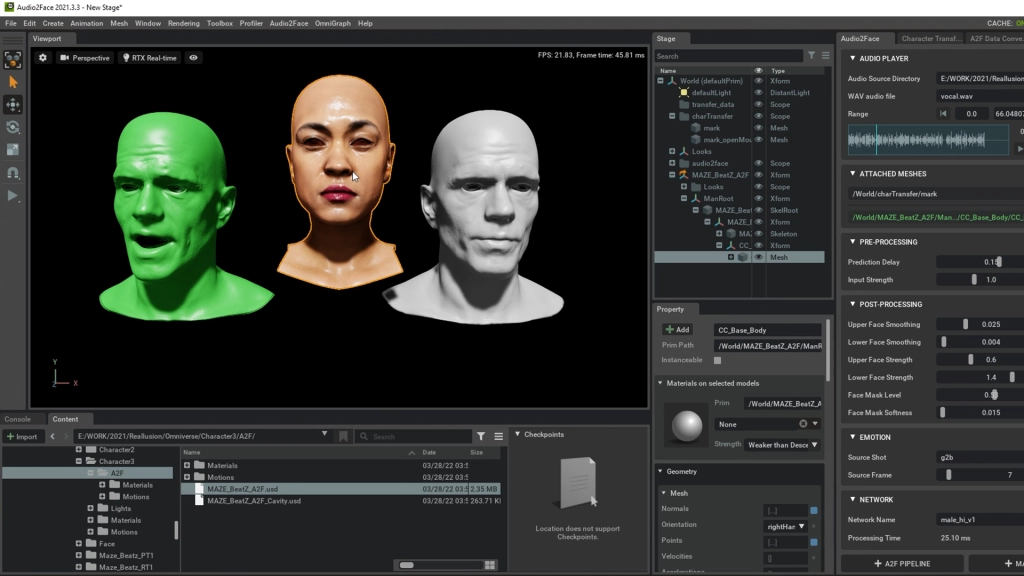
I was blown away at how well Audio2Face was able to use the vocal of my female rap artist to create the lip sync! Audio2Face also offers several powerful tools under the Emotion tab, that make it possible to add nuanced lip movements after the ai applies the data from the audio file onto the characters head.
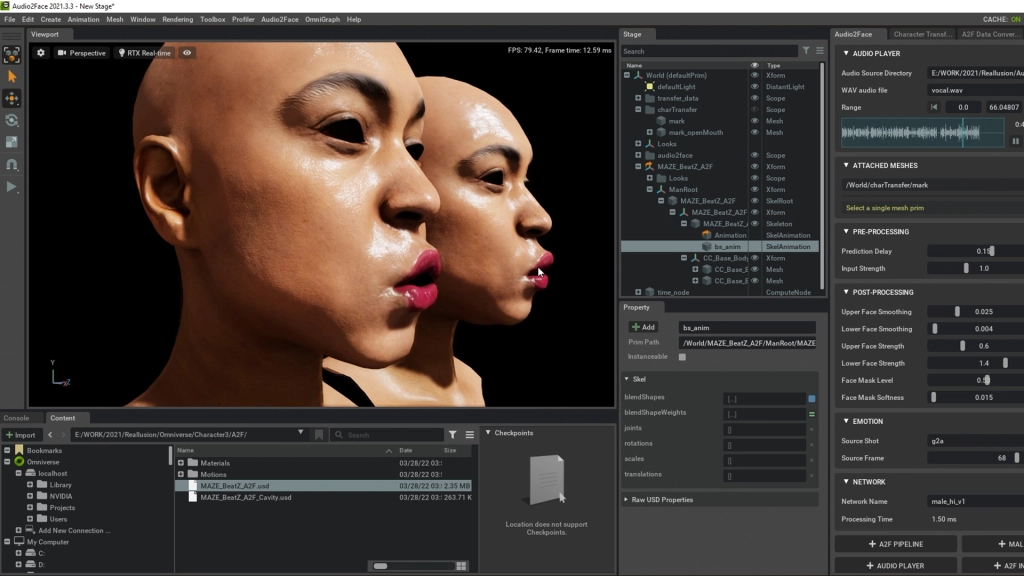
After applying the Facial mocap to the head of my character in Audio2Face, I exported the data as a json file, with just the lower part of the face.
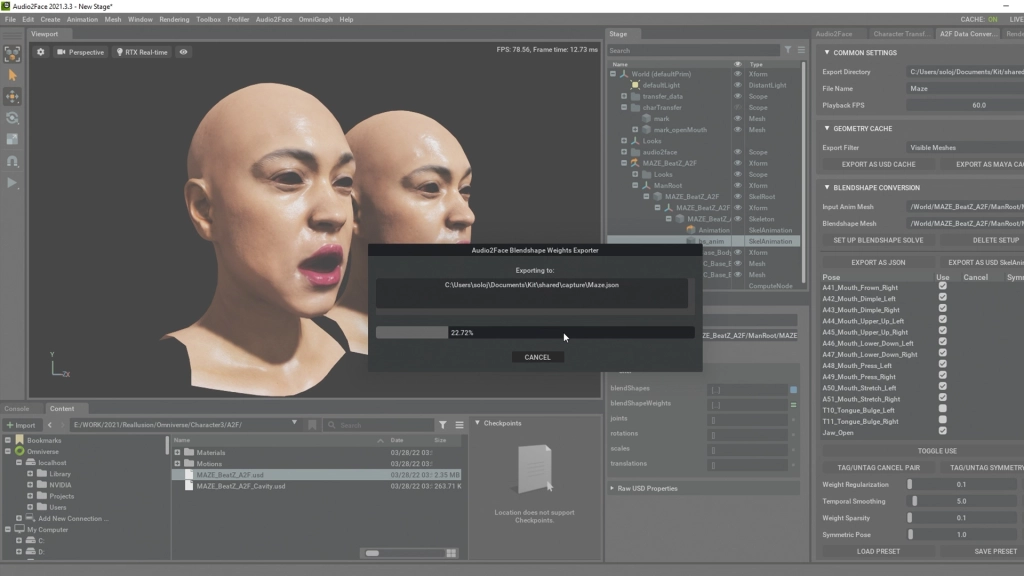
Audio2Face does an awesome job of capturing the nuances of the voice in the audio track, but one thing that it wasn’t able to capture, at least as of the writing of this article, is the tongue movement and the eye expressions that one needs to create a convincing facial performance. I believe a solution is in the works for future versions of Audio2Face, but for my video, I turned to the amazing animation tools inside of iClone to add those much needed facial animation nuances.
One of those awesome tools is called AccuLips. I was able to take advantage of the text to speech power of AccuLips to create an added layer of facial animation which included tongue movement.
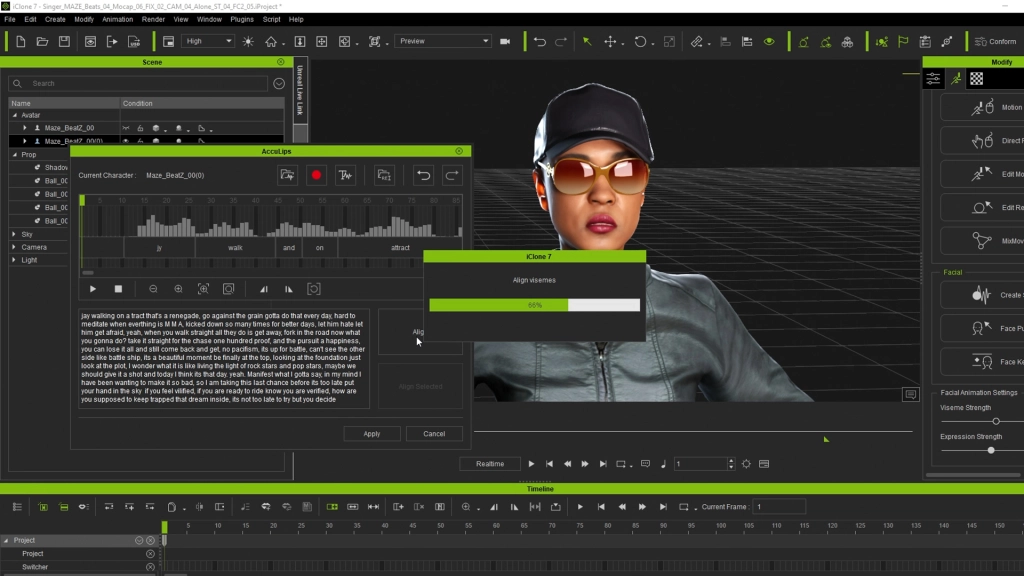
I was able to further refine the lip sync with the Lip options which gave me access to the individual visemes to fix any area of the mouth movement that needed improvement.

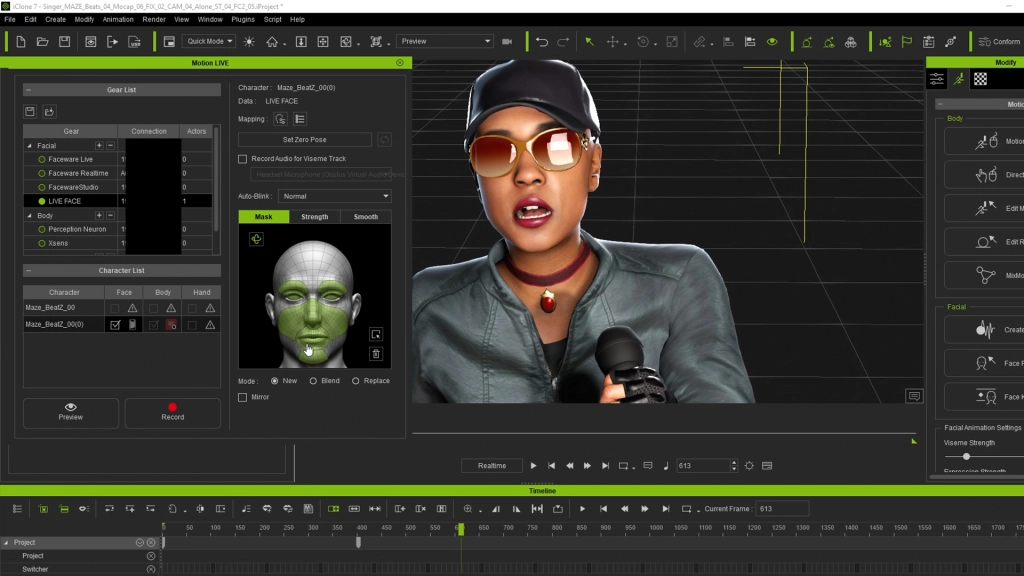
The final step of the facial animation was to add some blinking and more custom upper face, facial animation to give my rap artist some personality. I used an iPhone X to capture myself performing along to the rap vocal. For capturing the data from the iPhone X, I used the Live Face plugin in the Motion Live inside of iClone together with the Live Face iOS app from Reallusion.
I was also able to use the iClone mocap editing animation tools to adjust the Perception Neuron data. I loaded the mocap file I had saved from the session with my daughter, and applied it to my character. iClone made it so much easier to edit the mocap from the Perception Neuron Studio, captured using Axis Studio from Noitom.
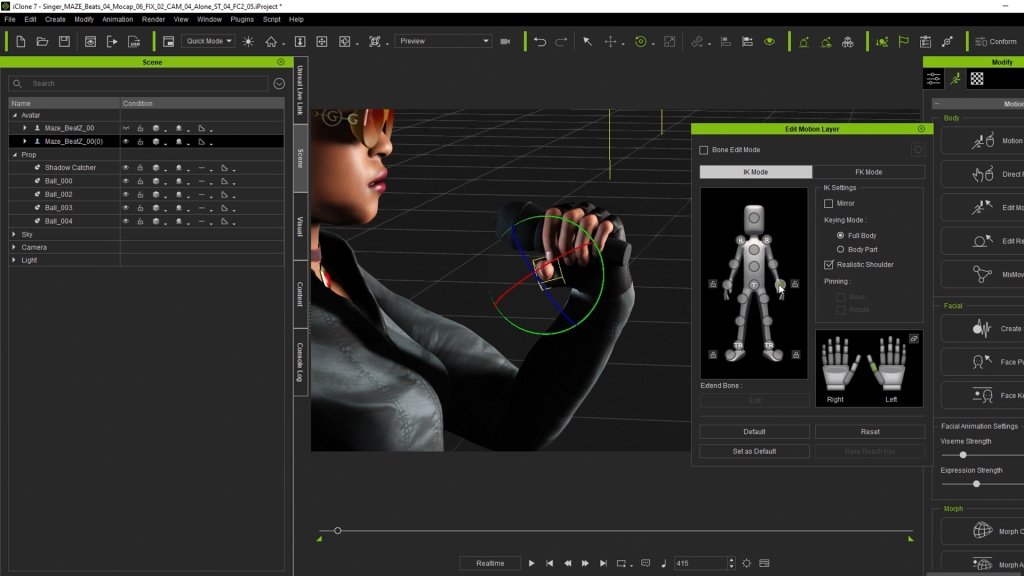
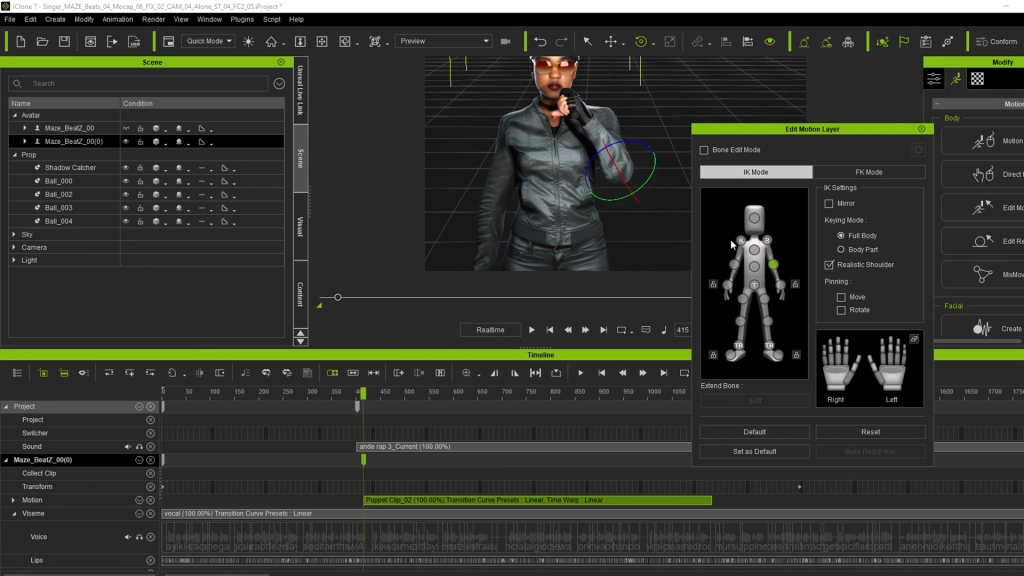
With the Edit Motion Layer tool, I was able to fix the fingers of the character, and add the grasping of the microphone that she used in the final video.
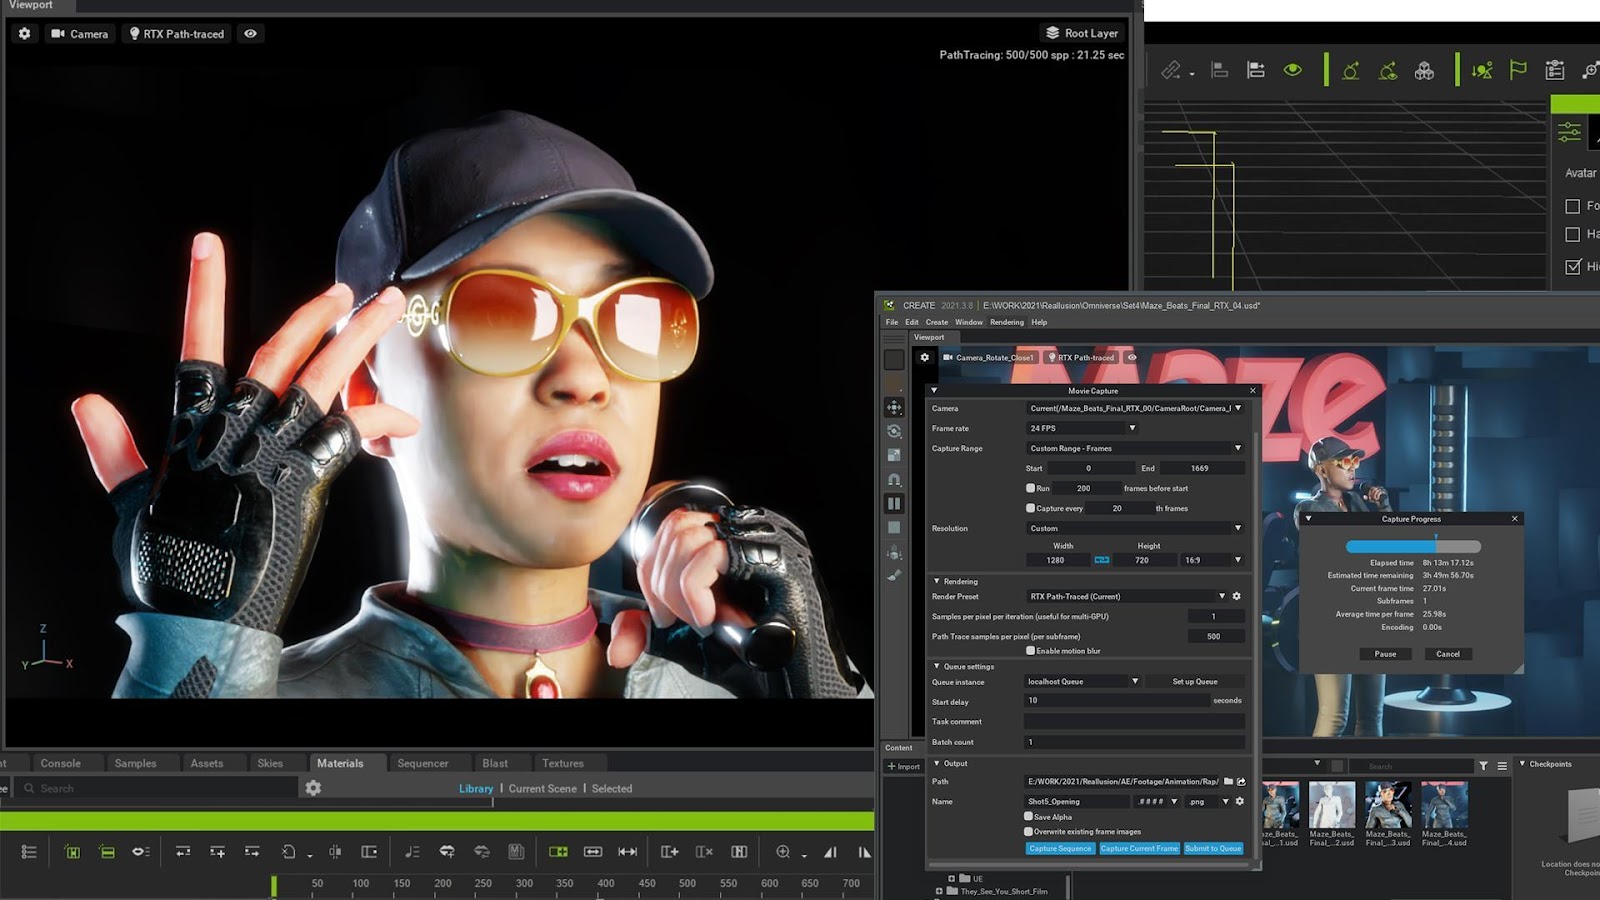
How I Setup and Rendered the Final Video in Omniverse
Once I was happy with both the facial and full body animation, I selected my rap artist character and exported her as a USD file from iClone to Omniverse. I exported 2 versions, one for RTX and another for Path Tracing. Doing it that way offered me the flexibility of choosing whether to render using Path tracing or Real-time rendering in Omniverse.
Exporting as Path Tracing has the advantage of providing Omniverse with a character that has a beautiful skin shader that supports subsurface scattering (SSS). The Character Creator models come prepared with a beautiful skin shader that looks great when rendered with path tracing in Omniverse, but they also take longer to render compared to the RTX version.
I loaded my rap artist into a scene I had prepared using a set I exported from Daz Studio as an FBX and loaded into iClone. I used iClone to set up the audition stage and also placed the character in the focus area, which I then used to set up different cameras that I knew I would need to render from once I got to Omniverse. It’s truly awesome that Omniverse supports all the lighting and camera animation from iClone.
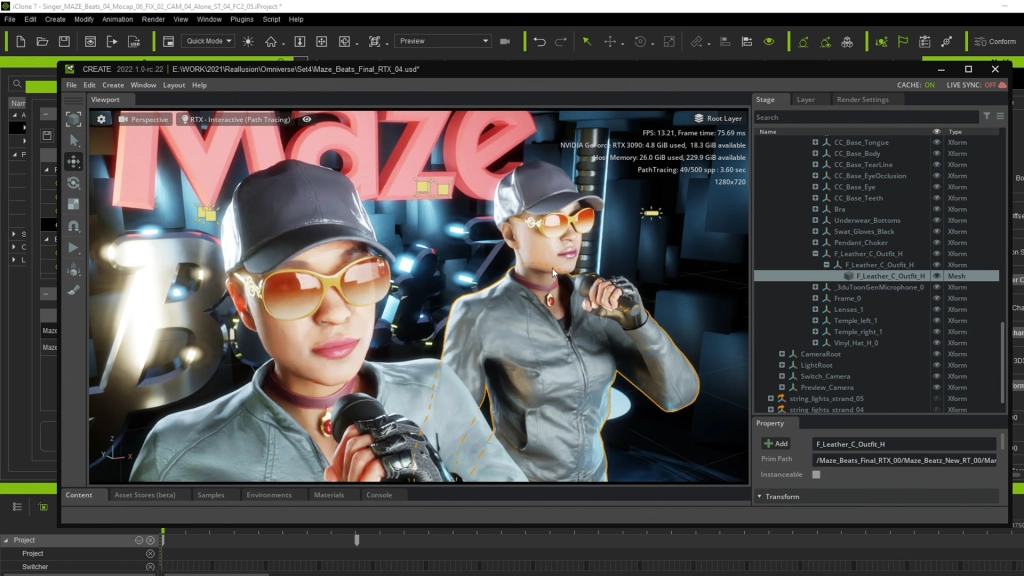
I set up some additional lighting inside of Omniverse to bring the stage to life and to add camera movement. To preview the animation before rendering, I set the display in Omniverse to real-time, which made it very easy to iterate and make camera and lighting adjustments.
I rendered the final animation using Path Tracing. Having a good GPU goes a long way towards speeding up your renders in Omniverse. I also used the built-in denoiser to help speed up the renders.
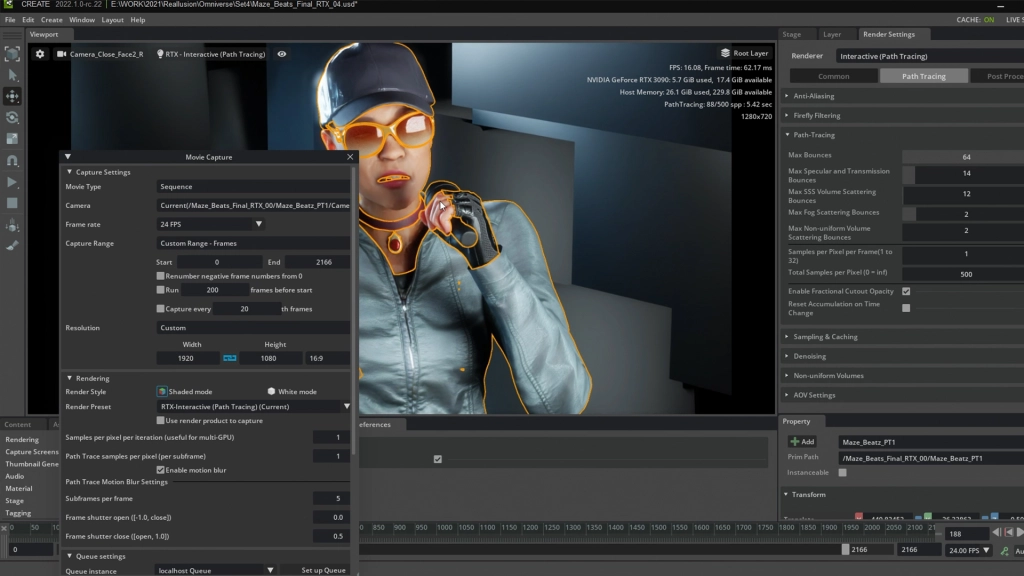
For rendering, I used a custom machine from the team at Puget System, that has an NVIDIA RTX 3090. This made a huge difference in turning around the final music video. Rendering at 2K can take up a lot of space, so I recommend having an external SSD drive with plenty of space, especially if you end up with an audio file that is longer than 2 minutes.
Final Thoughts
I highly recommend the Omniverse, Audio2Face, Character Creator and iClone combo solution as a go-to facial animation workflow in your storytelling journey. I believe they will make a huge difference in your project. So go ahead and give them a try.
NVIDIA offers Omniverse and Audio2Face as free downloads. Reallusion also offers the Omniverse iClone Connector as a free download that you can find inside of your Omniverse Launcher. Reallusion offers versions of iClone and Character Creator for you to try out before you decide to purchase. If you don’t have a motion capture suit or don’t own Character Creator, you can use the amazing characters and mocap from ActorCore, the 3D people and mocap animation Library.